Sunday, November 5, 2017

RDKit installation in Virtual environment


Here are the steps to install RDKit in the Virtual environment. I used Ubuntu 16.04


  • Create virtual environment, for which a create directory and make VM on it.

mkdir VM1

python -m virtualenv VM1 (python3 -m virtualenv VM1 )

  • Activate the virtual environment

source ~/VEs/VM1/bin/activate
  • Requisites of RDKit from pip
pip install numpy matplotlib boost yapf coverage cmake pandas
(pip3 install numpy matplotlib boost yapf coverage cmake pandas)
  • Packages needed for the installation of boost
sudo apt install build-essential python-numpy cmake python-dev sqlite3 libsqlite3-dev libboost-dev libboost-system-dev libboost-thread-dev libboost-serialization-dev libboost-python-dev libboost-regex-dev
(sudo apt install build-essential python3-numpy cmake python3-dev sqlite3 libsqlite3-dev libboost-dev libboost-system-dev libboost-thread-dev libboost-serialization-dev libboost-python-dev libboost-regex-dev)
tar zxvf boost_1_66_1.tar.gz
cd boost_1_66_1
  • Bootstrapping boost in the VE location
./bootstrap.sh --prefix=/home/CD/CLPB/VEs/VM1 (here prefix path is location where lib directory exists in VE)
  • Building boost
./b2 (this step takes a while to complete)
  • SWIG installation, download it from here (into tools directory under VE - used this option just to keep all the tools together).
tar zxvf swig-3.0.12.tar.gz
cd swig-3.0.12
./configure --prefix=/home/CD/CLPB/VEs/VM1 (here prefix path is location where lib directory exists in VE)
make -j 6 (to let use the process 6 cpus)
make check (check will take a while as it checks multiple languages compatibility)
make install
  • Packages need for RDKit in ubuntu
sudo apt install doxygen
  • Download latest RDKit from tags
cp rdkit-Release_2017_09_3.tar.gz /home/CD/CLPB/VEs/VM1/
cd /home/CD/CLPB/VEs/VM1/
tar zxvf rdkit-Release_2017_09_3.tar.gz
mv rdkit-Release_2017_09_3 RDKit
  • Paths are set in /home/CD/CLPB/VEs/VM1/bin/activate file where the Virtual environment activate file exists.

########## Paths for RDKit
export RDBASE="/home/CD/CLPB/VEs/VM1/RDKit"
export PYTHONPATH="$RDBASE:/home/CD/CLPB/VEs/VM1/lib:/home/CD/CLPB/VEs/VM1/local/lib:/home/CD/CLPB/VEs/VM1/bin/python2.7"
export LD_LIBRARY_PATH="$RDBASE/lib"
export LD_LIBRARY_PATH="/usr/lib/x86_64-linux-gnu:$LD_LIBRARY_PATH"
  • Building RDKit
cd RDKit
mkdir build
cd build
  • cmake options to install in VE and use the Boost libraries which are installed in VE
cmake -DBOOST_ROOT=/home/CD/CLPB/VEs/VM1/lib -DCMAKE_INSTALL_PREFIX=/home/CD/CLPB/VEs/VM1 .. (cmake command is complete one command at a time)
  • Make the RDKit installation
make -j 6 (to let use the process 6 cpus)
make install
  • Test the installation with ctest
ctest
Tuesday, March 6, 2012

How to install Google Chrome without root / admin access in Linux or Windows.

If you have to install in windows there is nothing much I have to say. Because you can just download and run it will not ask for the administrative access. (having seen windows audience visiting the blog I have added this information if it does not work do comment here.)

______________________
I have installed google chrome without root access in fedora environment, I have a 64 bit computer and so I have used 64 bit version check your computer for 32 or 64 bit, based on which the folder which is lib64 will be changed.

following are the instructions:

mkdir ~/chrome; cd ~/chrome
rpm2cpio ~/Downloads/google-chrome-stable_current_x86_64.rpm | cpio -id
cd opt/google/chrome
ln -s /usr/lib64/libnss3.so libnss3.so.1d
ln -s /usr/lib64/libnssutil3.so libnssutil3.so.1d
ln -s /usr/lib64/libsmime3.so libsmime3.so.1d
ln -s /lib64/libplc4.so libplc4.so.0d
ln -s /lib64/libnspr4.so libnspr4.so.0d
ln -s /lib64/libbz2.so.1.0.6 libbz2.so.1.0
ln -s ~/chrome/opt/google/chrome/google-chrome ~/bin/google-chrome

The last line which is in green is to include as a command line command. 

To start google chrome you will have to use some in secured options i.e as follows:

google-chrome --no-sandbox %U

You can make a link to desktop depending on your environment with above options in the command. 

If you open first time after logging into your user in terminal you will see that it does not version information errors but google-chrome works fine.

Would appreciate if any  one have better solution.

___________________________________________________________

Updating new chrome version 

While updating existing local version of chrome you can use the existing contents. Keep the following files(under the chrome directory which we created above) and delete all other files


./opt/google/chrome/libbz2.so.1.0 -> /lib64/libbz2.so.1.0.4
./opt/google/chrome/libbz2.so.1.0d -> /lib64/libbz2.so.1.0.4
./opt/google/chrome/libnspr4.so.0d -> /lib64/libnspr4.so
./opt/google/chrome/libnss3.so.1d -> /usr/lib64/libnss3.so
./opt/google/chrome/libnssutil3.so.1d -> /usr/lib64/libnssutil3.so
./opt/google/chrome/libplc4.so.0d -> /lib64/libplc4.so
./opt/google/chrome/libsmime3.so.1d -> /usr/lib64/libsmime3.so
./opt/google/chrome/libz.so.1.0d -> /lib64/libz.so.1
./opt/google/chrome/libz.so.1.2.3.0d -> /lib64/libz.so.1.2.3
./opt/google/chrome/plugins/libnpjp2.so -> /usr/java/jre1.6.0_26/lib/amd64/libnpjp2.so

and delete other files.

After that run same as above i.e

rpm2cpio ~/Downloads/google-chrome-stable_current_x86_64.rpm | cpio -id

If it does not work do comment here.

Saturday, February 26, 2011

Using Google Apps on your Android phone

(Source Google Administrative Help center)

Your Android device is easy to setup for Google Apps email, contacts, and calendar access. Here's how to set it up:

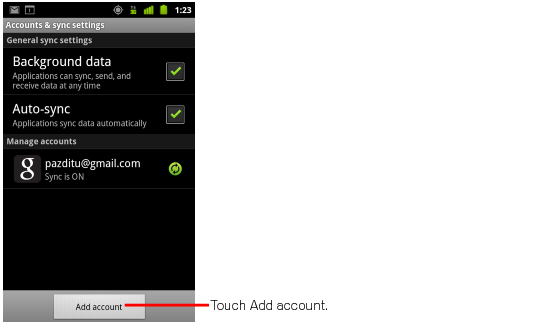
  1. Open the Accounts & Sync Settings screen on your phone. You can do this in Contacts by pressing Menu and touching Accounts, or directly in the Settings application.

    Android add an account screen
  2. The Accounts & Sync Settings screen displays your current sync settings and a list of your current accounts.
  3. Touch Add account.
  4. Touch Google to add your Google Apps account.
  5. Touch Sign in when prompted for your Google Account.
  6. Enter your full Google Apps email address as your username, and then enter your password.
  7. Select which services you'd like to sync.

Setting up Mozilla Thunderbird 3 in IndiaYouth

If you're using an older version of Thunderbird, we recommend upgrading to the latest version.

Users who want to access Gmail from Mozilla Thunderbird should do the following:

  1. Make sure you've enabled IMAP in your Gmail account.
  2. Open Thunderbird.
  3. Click the Tools menu, and select Account Settings.
  4. On the bottom left, click Account Actions, and select Add Mail Account.
  5. Enter your Name, Email Address, and Password.
  6. Click Continue.
    Note: Thunderbird will automatically try to determine the appropriate IMAP connection settings for your account. However, this feature doesn't work for Google Apps accounts. Instead, click Stop to stop the automatic configuration. (Alternatively, you can wait for this message to appear: Thunderbird failed to find the settings for your email account.)
  7. Click the Manual Setup button.
  8. From the left navigation bar, click Server Settings, and fill in the following information:
    • Server Name: imap.gmail.com
    • Port: 993
    • User Name: your full email address [username@indiayouth.info]
    • Connection security: SSL/TLS
  9. From the left navigation bar, click Outgoing Server (SMTP).
  10. Select the default server, and click Edit.
  11. Fill in the following information, and click OK.
    • Server Name: smtp.gmail.com
    • Port: 465
    • Connection security: SSL/TLS
    • Authentication method: Normal password
    • User Name: your full email address [username@indiayouth.info]
  12. Click OK to complete the set up process.
  13. Check our recommended client settings, and adjust your client's settings as needed.

Congratulations! You should now be able to send and receive Gmail messages from Thunderbird.

Sunday, November 8, 2009

Recommended Mail Account Features

Following are the recommended features after you get the mail account:

  1. Click on Settings :
  2. Click on Accounts:
  3. Click on Change password and change the password :
  4. Now click on Labs:
  5. In Labs section Enable following:
  • Right-side chat
  • Default 'Reply to all'
  • Navbar drag and drop
  • Go to label
  • Send & Archive
  • Undo Send
  • Search Autocomplete
  • Google Calendar gadget
  • Google Docs gadget

Sunday, November 1, 2009

Thunder Bird in IndiaYouth.info

Here in this blog we will see how we can configure indiayouth.info mail account in thunderbird.


Some points to know before using Thunderbird E-Mail client.

  1. It is useful because if you use this method you don't have to spend more internet time. You can connect to the internet for just 5 minutes and synchronize your mails.
  2. You will not be able to use the chat along with your mails.
  3. Before you start using it you need to decide few things among IMAP and POP accounts. And here the suggestion is to use IMAP as it is developed to take more bigger storage as well. However read about IMAP and POP.
  4. To know the differences between them click here
  5. Just to remind it is suggestion is to use IMAP.
  6. To activate IMAP or POP facility follow these steps
  7. In indiayouth.info mail account at mail.indiayouth.info click on settings
  8. Then click on Forwarding POP/IMAP
  9. Then enable either IMAP or POP according to the requirement

To download Thunderbird for windows click here. Download and install Thunder bird.

Then follow these instructions: for using IMAP

  1. Open Thunderbird, and select Tools > Account Settings.
  2. Click Add Account.
  3. Select the Email account radio button and click Next. The Identity screen appears.
  4. Enter your full name in the Your Name field. Enter your Indiayouth.info email address (username@indiayouth.info) in the Email Address field, and click Next.
  5. Select IMAP as the type of incoming server you are using. Enter imap.gmail.com in the Incoming Server field.
  6. Set the Outgoing Server to smtp.googlemail.com and click Next.
  7. Enter your full email address (including @indiayouth.info) in the Incoming User Name and Outgoing User Name fields, and click Next.
  8. Enter a name for your email account in the Account Name field, and click Next.
  9. Verify your account information in the dialog box, and click Finish.
  10. Select Server Settings from the folder list below your new account.
  11. Update the Port value to 993.
  12. In the Security Settings section, select SSL from the Use secure connection options.
  13. Select the 'Check for messages at startup' checkbox and the 'Check for new messages every 10 minutes' checkbox.
  14. Click Outgoing Server (SMTP) in the folder list.
  15. Select the smtp.gmail.com (Default) entry from the list and click Edit. The SMTP Server page appears.
  16. Enter smtp.gmail.com as the Server Name and set the Port to 587.
  17. Select User name and password and enter your full email address (including @indiayouth.info) in the User Name field.
  18. Select TLS from the Use secure connection radio buttons and click OK.
  19. Click OK to save your changes and exit the Account Settings dialog.
Some More recommended settings


From the Tools menu, select Account Settings and highlight your Gmail address.

1. On the Server Settings tab:

Check for new messages at startup > checked
Check for new messages every 10 minutes > checked
When I delete a message > Mark it as deleted
Clean up ("Expunge") Inbox on Exit > do NOT check
Empty Trash on Exit > do NOT check

2. On the Copies & Folders tab in the When sending messages, automatically section:

Place a copy in > do NOT check

3. On the Copies & Folders tab in the Drafts and Templates section:

Keep message drafts in > Other
Other > [Your Gmail address] > [Gmail] > Drafts

4. On the Junk Settings tab

Enable adaptive junk mail controls > do NOT check

5. Click OK to save and close your account settings.

If you'd like to to further enhance your IMAP experience, please carefully follow these additional steps:
  1. In the 'Tools' menu, open Options.
  2. On the 'Advanced' tab, open the General section.
  3. Click the Config Editor button.
  4. In the 'Filter' box, type 'browser.cache.memory.capacity'
  5. Double-click on the browser.cache.memory.capacity entry to edit its value.
  6. Change the value to '30720' and click OK.
  7. Delete the text in the 'Filter' box and type 'mail.server.default.fetch_by_chunks'
  8. Double-click on the mail.server.default.fetch_by_chunks entry to set its value to false.
  9. Close the 'about:config' window and then close 'Options' by clicking OK