Saturday, February 26, 2011

Using Google Apps on your Android phone

(Source Google Administrative Help center)

Your Android device is easy to setup for Google Apps email, contacts, and calendar access. Here's how to set it up:

  1. Open the Accounts & Sync Settings screen on your phone. You can do this in Contacts by pressing Menu and touching Accounts, or directly in the Settings application.

    Android add an account screen
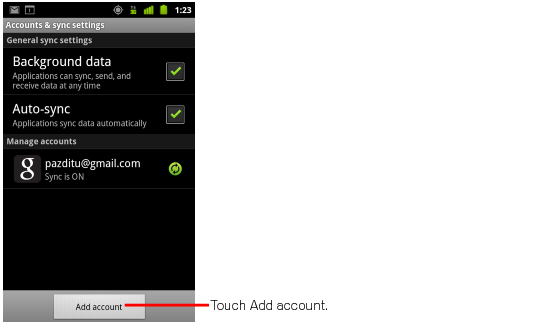
  2. The Accounts & Sync Settings screen displays your current sync settings and a list of your current accounts.
  3. Touch Add account.
  4. Touch Google to add your Google Apps account.
  5. Touch Sign in when prompted for your Google Account.
  6. Enter your full Google Apps email address as your username, and then enter your password.
  7. Select which services you'd like to sync.

Setting up Mozilla Thunderbird 3 in IndiaYouth

If you're using an older version of Thunderbird, we recommend upgrading to the latest version.

Users who want to access Gmail from Mozilla Thunderbird should do the following:

  1. Make sure you've enabled IMAP in your Gmail account.
  2. Open Thunderbird.
  3. Click the Tools menu, and select Account Settings.
  4. On the bottom left, click Account Actions, and select Add Mail Account.
  5. Enter your Name, Email Address, and Password.
  6. Click Continue.
    Note: Thunderbird will automatically try to determine the appropriate IMAP connection settings for your account. However, this feature doesn't work for Google Apps accounts. Instead, click Stop to stop the automatic configuration. (Alternatively, you can wait for this message to appear: Thunderbird failed to find the settings for your email account.)
  7. Click the Manual Setup button.
  8. From the left navigation bar, click Server Settings, and fill in the following information:
    • Server Name: imap.gmail.com
    • Port: 993
    • User Name: your full email address [username@indiayouth.info]
    • Connection security: SSL/TLS
  9. From the left navigation bar, click Outgoing Server (SMTP).
  10. Select the default server, and click Edit.
  11. Fill in the following information, and click OK.
    • Server Name: smtp.gmail.com
    • Port: 465
    • Connection security: SSL/TLS
    • Authentication method: Normal password
    • User Name: your full email address [username@indiayouth.info]
  12. Click OK to complete the set up process.
  13. Check our recommended client settings, and adjust your client's settings as needed.

Congratulations! You should now be able to send and receive Gmail messages from Thunderbird.